Continuously deploy Jekyll to Azure Web Apps
Mar 31, 2015 · 4 minute readI’ve been thinking about writing a blog for a while now, but there are just so many blogging platforms out there to choose from. I finally settled on Jekyll as it’s really lightweight (compared to platforms like Wordpress), it has an active development community, and you can write all your articles in Markdown.
Many Jekyll users host their Jekyll sites through GitHub Pages, and there are a lot of advantages to this:
- Free web hosting
- Built in version control
- Continuous deployment
However, the main disadvantage is that GitHub Pages runs Jekyll in safe mode. This means that it’s not possible to extend Jekyll with plugins. There are some ways to avoid this restriction, but they’re all awkward workarounds.
A solution
I still wanted all the advantages GitHub Pages has, but with Jekyll plugins too. The solution was to use Travis to build the Jekyll site and host it on Azure Web Apps. Travis is a continuous integration service that’s free for open source projects to use, and I’m going to use it to build my Jekyll site. Azure provides cheap, or even free, web hosting for websites and it’s what I’m familiar with.
Azure
First of all you need to create an Azure Web App.
- Go to the Azure Portal
- Click New > Compute > Web App > Quick Create
- Enter the URL you want and select an app service plan
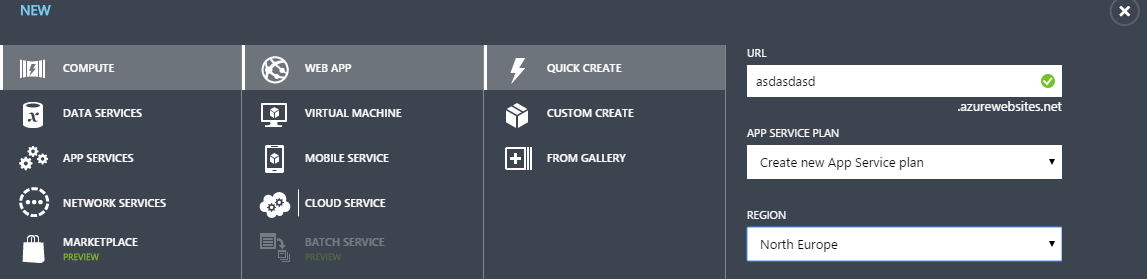
On the dashboard for your new web app, make a note of the FTP host name and your deployment credentials. If you’ve forgotten your deployment credentials you can reset them from here as well.
GitHub
I know I said earlier that I didn’t want to use GitHub, but I’m not actually using GitHub Pages. Travis depends on GitHub Webhooks in order to figure out when you push an update to your site and kick off a build. In addition to the standard Jekyll files you’ll need to add a .travis.yml configuration file as well as a build and deploy script. My Travis configuration looks like this:
 1language: ruby
 2rvm:
 3  - 2.2
 4script:
 5  - chmod +x script/build
 6  - ./script/build
 7after_success:
 8  - chmod +x script/deploy
 9  - ./script/deploy
10env:
11  global:
12    - NOKOGIRI_USE_SYSTEM_LIBRARIES=true
Taking it section by section
1language: ruby
2rvm:
3  - 2.2
This tells Travis that the project is Ruby based, and what version of Ruby to use - in this case Ruby 2.2.
1script:
2  - chmod +x script/build
3  - ./script/build
My build script in the scripts directory. This sets the execute flag, then executes it.
1after_success:
2  - chmod +x script/deploy
3  - ./script/deploy
If the build is successful, Travis will set the execute flag on the deploy script, then execute it.
1env:
2  global:
3    - NOKOGIRI_USE_SYSTEM_LIBRARIES=true
I’m using html-proofer to check all the links and images on my site, and this allows me to speed up the build time by using pre-installed libraries.
Now onto the build script. There’s nothing terribly exciting here, just build the site and run html-proofer on it.
1bundle exec jekyll build
2bundle exec htmlproof ./_site
The real magic happens in the deploy script.
 1sudo apt-get install -qq ncftp
 2
 3ncftp -u "$USERNAME" -p "$PASSWORD" $HOST<<EOF
 4rm -rf site/wwwroot
 5mkdir site/wwwroot
 6quit
 7EOF
 8
 9cd _site
10ncftpput -R -v -u "$USERNAME" -p "$PASSWORD" $HOST /site/wwwroot .
I’m making use of a handy program called ncftp in order to deploy my site. Firstly Travis deletes the currently deployed site, then puts the generated Jekyll site on the FTP server.
Travis
To put it all together you need to configure Travis builds for your GitHub repository, and set the environment variables to allow Travis to deploy to Azure:
- Go your your Travis profile
- Click the slider next to your Jekyll repository
- Go to your repositories and click on your Jekyll repository
- Click Settings > Environment variables
- Set environment variables for your Azure Web App where
USERNAMEisazure-web-app-name\\azure-deployment-usernamePASSWORDisazure-deployment-passwordHOSTisftp-server-name.ftp.azurewebsites.windows.net
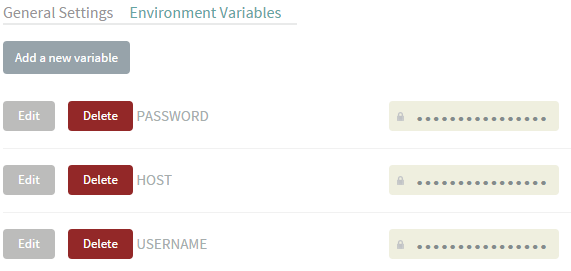
Remember that USERNAME requires a double backslash to escape the character in the terminal.
Putting it all together
Now that everything is all configured all you need to do is push a commit to GitHub and wait. If everything is good you should see your Jekyll site deployed automatically to your Azure Web App - though if you’re anything like me html-proofer will have picked up some broken links on your site!