Setting up nginx reverse proxy with Let’s Encrypt on unRAID
Mar 28, 2016 · 3 minute readLate last year I set about building a new NAS to replace my aging HP ProLiant MicroServer N36L (though that’s a story for a different post). I decided to go with unRAID as my OS, over FreeNAS that I’d been running previously, mostly due to the simpler configuration, ease of expanding an array, and support for Docker and KVM.
Docker support makes it a lot easier to run some of the web apps that I rely on like Plex, Sonarr, CouchPotato and more, but accessing them securely outside my network is a different story. On FreeNAS I ran an nginx reverse proxy in a BSD jail, secured using basic auth, and SSL certificates from StartSSL. Thankfully there is already a Docker image, nginx-proxy by jwilder, which automatically configures nginx for you. As for SSL, Let’s Encrypt went into public beta in December, and recently issued their millionth certificate. There’s also a Docker image which will automatically manage your certificates, and configure nginx for you - letsencrypt-nginx-proxy-companion by jrcs.
Preparation
Firstly, you need to set up and configure Docker. There is a fantastic guide on how to configure Docker here on the Lime Technology website. Next, you need to install the Community Applications plugin. This allows us to install Docker containers directly from the Docker Hub.
In order to access everything from outside your LAN you’ll need to forward ports 80 and 443 to ports 8008 and 443, respectively, on your unRAID host. In addition, you’ll need to use some sort of Dynamic DNS service, though in my case I bought a domain name and use CloudFlare to handle my DNS.
nginx
From the Apps page on the unRAID web interface, search for nginx-proxy and click ‘get more results from Docker Hub’. Click ‘add’ under the listing for nginx-proxy by jwilder. Set the following container settings, changing your ‘host path’ to wherever you store Docker configuration files on your unRAID host
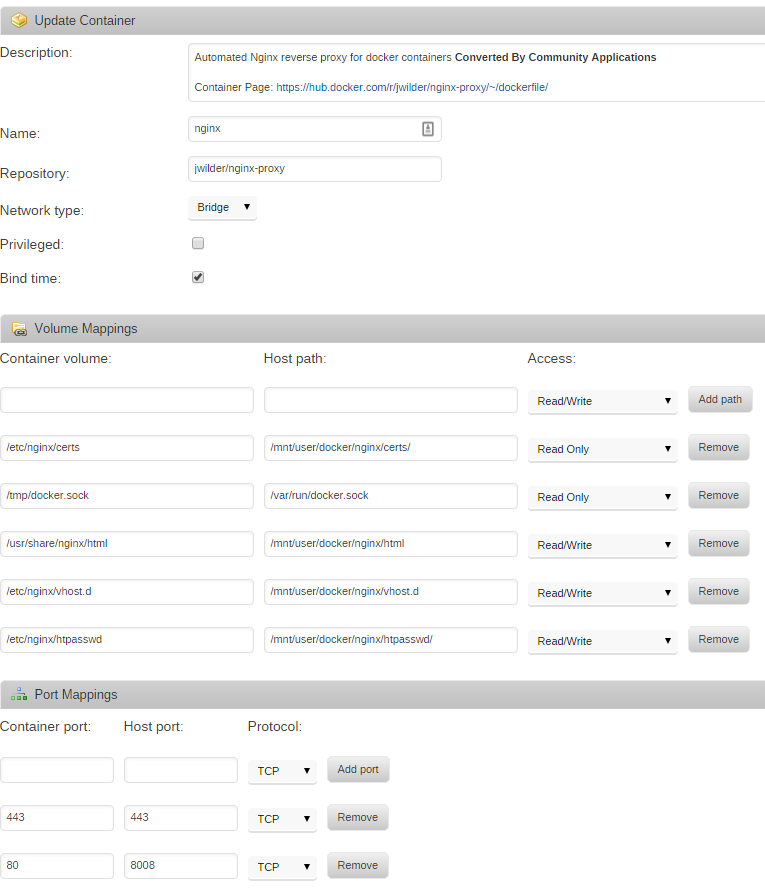
To add basic auth to any of the sites you’ll need to make a file with the VIRTUAL_HOST of the site, available to nginx in /etc/nginx/htpasswd. For example, I added a file in /mnt/user/docker/nginx/htpasswd/. You can create htpasswd files using apache2-utils, or there are sites available which can create them.
Let’s Encrypt
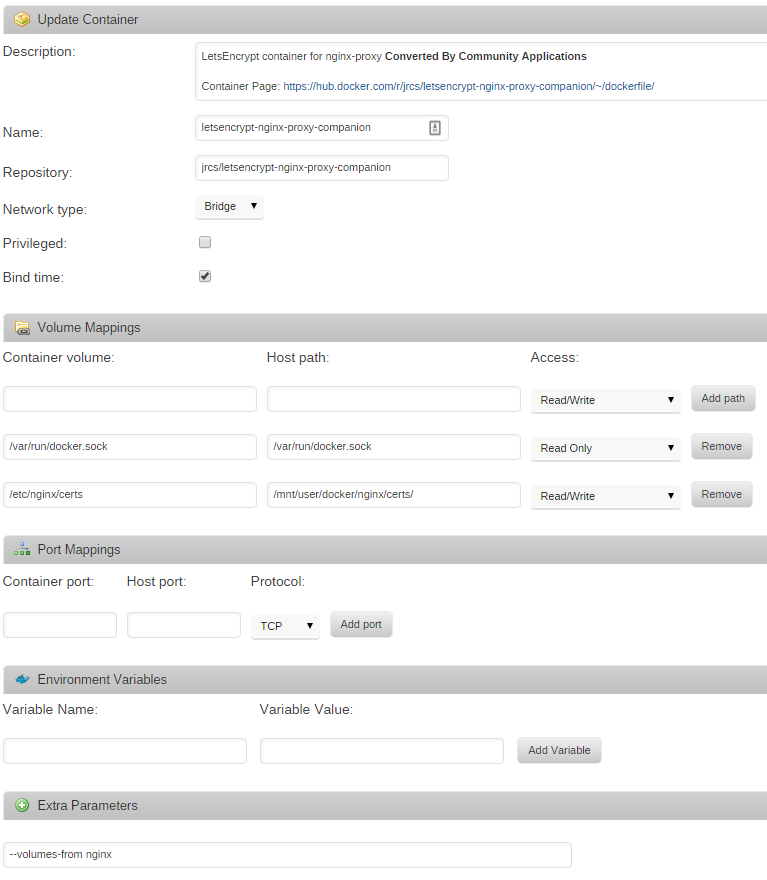
From the Apps page again, search for letsencrypt-nginx-proxy-companion, click ‘get more results from Docker Hub’, and then click ‘add’ under the listing for letsencrypt-nginx-proxy-companion by jrcs. Enter the following container settings, again changing your ‘host path’ to wherever you store Docker configuration files on your unRAID host
Putting it all together
In order to configure nginx, you’ll need to add four environment variables to the Docker containers you wish to put behind the reverse proxy. They are VIRTUAL_HOST, VIRTUAL_PORT, LETSENCRYPT_HOST, and LETSENCRYPT_EMAIL. VIRTUAL_HOST and LETSENCRYPT_HOST most likely need to be the same, and will be something like subdomain.yourdomain.com. VIRTUAL_PORT should be the port your Docker container exposes. For example, Sonarr uses port 8989 by default. LETSENCRYPT_EMAIL should be a valid email address that Let’s Encrypt can use to email you about certificate expiries, etc.
Once nginx-proxy, letsencrypt-nginx-proxy-companion, and all your Docker containers are configured you should be able to access them all over SSL, with basic auth, from outside your LAN. You don’t even have to worry about certificate renewals as it’s all handled for you.