Jul 26, 2022 · 6 minute readThe GitHub documentation has a lot of good advice about rate limits for its API, and how to make the most of them. However, since using the GitHub API, there are some things I’ve discovered that the documentation doesn’t cover, or doesn’t cover so well.
Conditional requests
This topic is actually covered very well in the GitHub documentation. To summarise, all REST API requests will return ETag headers, and most will return Last-Modified. You can make use of these by making subsequent requests with the If-None-Match and If-Modified-Since headers respectively. If the resource hasn’t been modified, you’ll get back a 304 Not Modified response, and the request won’t count against your rate limit.
To show you what I mean, here’s a short example:
 1$ curl -I -H "Authorization: token ..." "https://api.github.com/user
 2< HTTP/2 200
 3< etag: "0c05f6422602a76a6671b28fc70af0ff9775ee41c80aca7d527814bb79a0fc2c"
 4< last-modified: Mon, 21 Feb 2022 17:25:59 GMT
 5< x-ratelimit-limit: 5000
 6< x-ratelimit-remaining: 4993
 7< x-ratelimit-reset: 1645482669
 8
 9$ curl -I -H "If-None-Match: \"0c05f6422602a76a6671b28fc70af0ff9775ee41c80aca7d527814bb79a0fc2c\"" -H "Authorization: token ..." "https://api.github.com/user"
10< HTTP/2 304
11< etag: "0c05f6422602a76a6671b28fc70af0ff9775ee41c80aca7d527814bb79a0fc2c"
12< last-modified: Mon, 21 Feb 2022 17:25:59 GMT
13< x-ratelimit-limit: 5000
14< x-ratelimit-remaining: 4993
15< x-ratelimit-reset: 1645482669
16
17$ curl -I -H "If-Modified-Since: Mon, 21 Feb 2022 17:25:59 GMT" -H "Authorization: token ..." "https://api.github.com/user"
18< HTTP/2 304
19< last-modified: Mon, 21 Feb 2022 17:25:59 GMT
20< x-ratelimit-limit: 5000
21< x-ratelimit-remaining: 4993
22< x-ratelimit-reset: 1645482669
The first request uses one request of my rate limit, taking it from 4994 to 4993. But the next two requests use If-None-Match and If-Modified-Since headers, so my rate limit is still 4993.
Unfortunately, conditional requests are only available for the REST API. HTTP caching over GraphQL is not a simple problem, and it’s unlikely that GitHub will ever support it.
Prefer If-Modified-Since
The GitHub REST API documentation covers conditional requests pretty well. The reason I’m mentioning it? Well, the documentation says that you can use ETag or If-Modified-Since interchangeably—but they’re not equivalent. Take a look at this example:
1$ curl -I -H "Authorization:token ..." "https://api.github.com/repos/renovatebot/renovate/releases/latest"
2< HTTP/2 200
3< etag: "70eb55000ec3e69bc2d88079714612000a955d4afaf02643b6602d99fb60dd8d"
4< last-modified: Mon, 21 Feb 2022 21:47:30 GMT
And if I make the same request a little bit later…
1$ curl -I -H "Authorization:token ..." "https://api.github.com/repos/renovatebot/renovate/releases/latest"
2< HTTP/2 200
3< etag: "85f04330d7bca80e6e0d62ac1b41b6d57e2ff11744565655e46732d44736dba6"
4< last-modified: Mon, 21 Feb 2022 21:47:30 GMT
The ETag is different but the Last-Modified time is still the same as before. Based on this StackOverflow question, it appears as if this has been an issue for a while. So if a response has both an ETag and a Last-Modified time, I’d recommend using the Last-Modified time to make conditional requests.
Both REST and GraphQL
Saying “rate limit” isn’t really accurate. What I actually mean is “rate limits”. GitHub actually has nine different rate limits. Some are for very specific use cases, like integration_manifest for the GitHub App Manifest code conversion endpoint. But the two that are most useful are core (AKA REST) and graphql.
If I make a request to the rate limit endpoint, you can see all the different rate limits.
 1{
 2  "resources": {
 3    "core": {
 4      "limit": 5000,
 5      "used": 0,
 6      "remaining": 5000,
 7      "reset": 1656981763
 8    },
 9    "search": {
10      "limit": 30,
11      "used": 0,
12      "remaining": 30,
13      "reset": 1656978223
14    },
15    "graphql": {
16      "limit": 5000,
17      "used": 38,
18      "remaining": 4962,
19      "reset": 1656979534
20    },
21    "integration_manifest": {
22      "limit": 5000,
23      "used": 0,
24      "remaining": 5000,
25      "reset": 1656981763
26    },
27    "source_import": {
28      "limit": 100,
29      "used": 0,
30      "remaining": 100,
31      "reset": 1656978223
32    },
33    "code_scanning_upload": {
34      "limit": 1000,
35      "used": 0,
36      "remaining": 1000,
37      "reset": 1656981763
38    },
39    "actions_runner_registration": {
40      "limit": 10000,
41      "used": 0,
42      "remaining": 10000,
43      "reset": 1656981763
44    },
45    "scim": {
46      "limit": 15000,
47      "used": 0,
48      "remaining": 15000,
49      "reset": 1656981763
50    },
51    "dependency_snapshots": {
52      "limit": 100,
53      "used": 0,
54      "remaining": 100,
55      "reset": 1656978223
56    }
57  },
58  "rate": {
59    "limit": 5000,
60    "used": 0,
61    "remaining": 5000,
62    "reset": 1656981763
63  }
64}
The REST API has a rate limit of 5000 requests per hour. Separately, the GraphQL API has a rate limit of 5000 points per hour.
Depending on what API calls you want to make, you can intelligently split them across the REST and GraphQL APIs to achieve a higher overall limit. For example, if a GraphQL call is going to cost a lower number of points than the number of REST calls required to get the same data, you should make those calls via the GraphQL API. You should also bear in mind that you can make conditional requests to the REST API, but not to the GraphQL API.
Maximise page size
Whenever you’re making a request to an endpoint with pagination, you should check what the maximum results per page are and set your query parameter to that size.
The default size for most endpoints is 30 results, but the maximum size is often 100. If you forget to set this you might need to make four times as many requests to get the same number of results.
Use sorting
Most API calls allow you to sort them based on a date field when querying an endpoint. If you use this—and do some caching on your end as well—you can avoid having to fetch all pages for a request whenever you have a cache request.
For example, if you need to fetch the most recently changed pull requests for a repository, you should be sorting by updated and storing a local cache of pull requests. That way a conditional request cache miss won’t require you to fetch all the pages of a request. You can compare each page to your local cache, and only fetch the next page if required.
Use HEAD requests
This tip isn’t strictly about rate limits, but is useful when you’re eking out every last bit of performance. Nearly all GitHub REST API endpoints support HEAD requests, in addition to the other HTTP verbs. If you’re already using conditional requests, you can avoid having the body of a request sent over the wire by sending a HEAD request instead.
For example, here’s the header and body size for a GET request:
1$ curl -w \%{size_header}:\%{size_download} -s -o /dev/null -H "Authorization:token ..." "https://api.github.com/repos/renovatebot/renovate/releases"
21448:137229
And here’s the header and body size for the HEAD equivalent:
1$ curl -w \%{size_header}:\%{size_download} -s -o /dev/null -H "Authorization:token ..." "https://api.github.com/repos/renovatebot/renovate/releases"
21448:0
By making a HEAD request instead of a GET request, you can avoid being sent 137KB.
There is a trade-off, though. If you use conditional requests and have a cache miss, you’ll have to make the GET request anyway.
Summing up
Using these methods I’ve managed to eke out every bit of performance of the GitHub API for my integrations. Let me know what methods you use, or if there’s anything I’ve missed.
Mar 4, 2022 · 5 minute readFor a while now the Octokit libraries for .NET have lagged behind the JavaScript libraries, especially when it comes to webhooks. Unfortunately, I needed a GitHub webhook client for an internal project, so I had to write my own. It wasn’t too much extra effort to open source it, and thus Octokit.Webhooks was born!
I wanted to give a quick example of how to get up and running with Octokit.Webhooks, and what better way than to write a small GitHub bot?
Setup
For this project, I’m going to be using .NET 6.0 and ASP.NET’s new minimal APIs to simplify setup. From a terminal I’m going to create a new web API project:
1dotnet new webapi --output octokit-webhooks-sample
The default template is set up to be a weather forecast API, but I can simplify it a bit more for this sample. My Program.cs looks like this:
1var builder = WebApplication.CreateBuilder(args);
2
3var app = builder.Build();
4
5app.Run();
Next up I’m going to install the Octokit.Webhooks.AspNetCore package:
1dotnet add package Octokit.Webhooks.AspNetCore
This package consumes the Octokit.Webhooks package, which contains core functionality like deserializers and processors, and adds ASP.NET Core specific code, like automatic API endpoint mapping and shared secret verification.
Handling webhooks
Now that I’ve got my project set up, I need to create my own processor to handle incoming webhooks. Octokit.Webhooks ships with an abstract class called WebhookEventProcessor that does all the heavy lifting of deserializing incoming webhooks. All I need to do is to create my own class that inherits from it, and write some logic to act on the webhook events.
 1using Octokit.Webhooks;
 2using Octokit.Webhooks.Events;
 3using Octokit.Webhooks.Events.IssueComment;
 4
 5public sealed class MyWebhookEventProcessor : WebhookEventProcessor
 6{
 7
 8  private readonly ILogger<MyWebhookEventProcessor> logger;
 9
10  public MyWebhookEventProcessor(ILogger<MyWebhookEventProcessor> logger)
11  {
12    this.logger = logger;
13  }
14
15  protected override Task ProcessIssueCommentWebhookAsync(WebhookHeaders headers, IssueCommentEvent issueCommentEvent, IssueCommentAction action)
16  {
17    this.logger.LogInformation(issueCommentEvent.Comment.Body);
18    return Task.CompletedTask;
19  }
20}
I created a small class MyWebhookEventProcessor that inherits from WebhookEventProcessor, and has an override for ProcessIssueCommentWebhookAsync that logs out the comment body. I also get the headers and the action passed to this method, so I could write a switch case and have different handling for created, edited, and deleted actions, but this is enough for now.
I also need to hook up MyWebhookEventProcessor in my startup class.
 1using Octokit.Webhooks;
 2using Octokit.Webhooks.AspNetCore;
 3
 4var builder = WebApplication.CreateBuilder(args);
 5
 6builder.Services.AddSingleton<WebhookEventProcessor, MyWebhookEventProcessor>();
 7
 8var app = builder.Build();
 9
10app.UseRouting();
11
12app.UseEndpoints(endpoints =>
13{
14  endpoints.MapGitHubWebhooks();
15});
16
17app.Run();
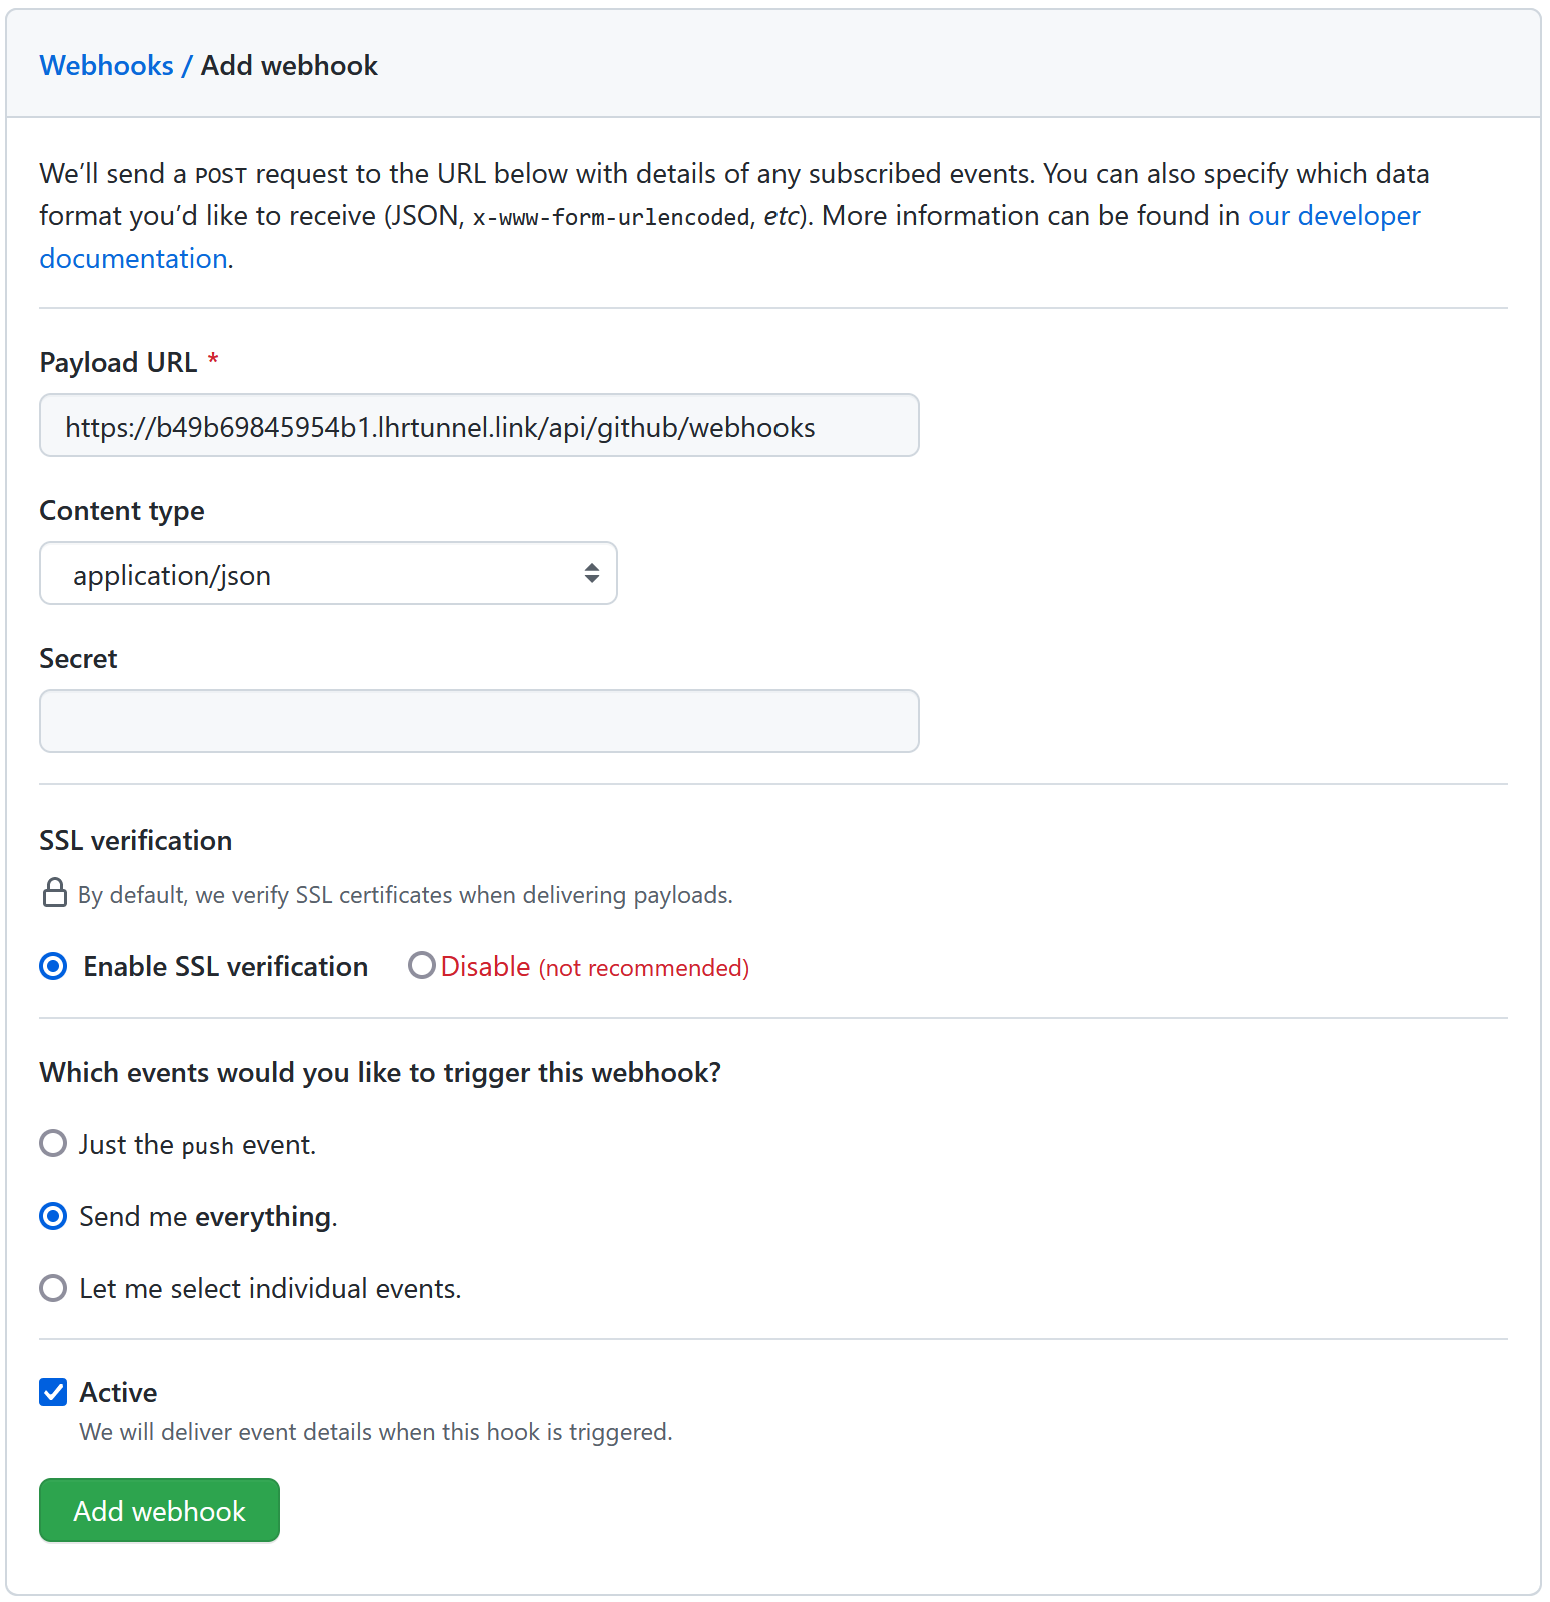
This is enough to tell ASP.NET to hook up dependency injection for MyWebhookEventProcessor, enable routing. It will also automatically add a route to handle incoming GitHub webhooks. By default it’s exposed at /api/github/webhooks, but you can use any route you’d like. MapGitHubWebhooks also accepts a shared secret which allows you to verify the content signature of GitHub webhooks.
That’s all the code required on my side. Now I just need to expose my service to the internet, and configure GitHub to start sending me webhooks.
GitHub webhook configuration
For GitHub to be able to send me webhooks, my service needs to be publicly accessible to the internet. I recently discovered a neat little service to do this with nothing more than ssh: localhost.run.
If I run my app with dotnet run then I can find the port that it’s running on:
1info: Microsoft.Hosting.Lifetime[14]
2      Now listening on: http://localhost:5002
And using localhost.run I can create a tunnel for that port:
1$ ssh -R 80:localhost:5002 nokey@localhost.run
2
3...
4
5b49b69845954b1.lhrtunnel.link tunneled with tls termination, https://b49b69845954b1.lhrtunnel.link
Now on GitHub if I visit the settings for a repository, and go to webhooks, I can create a new webhook configuration using that domain name.
Now all I need to do is create a comment on an issue in the same repository….
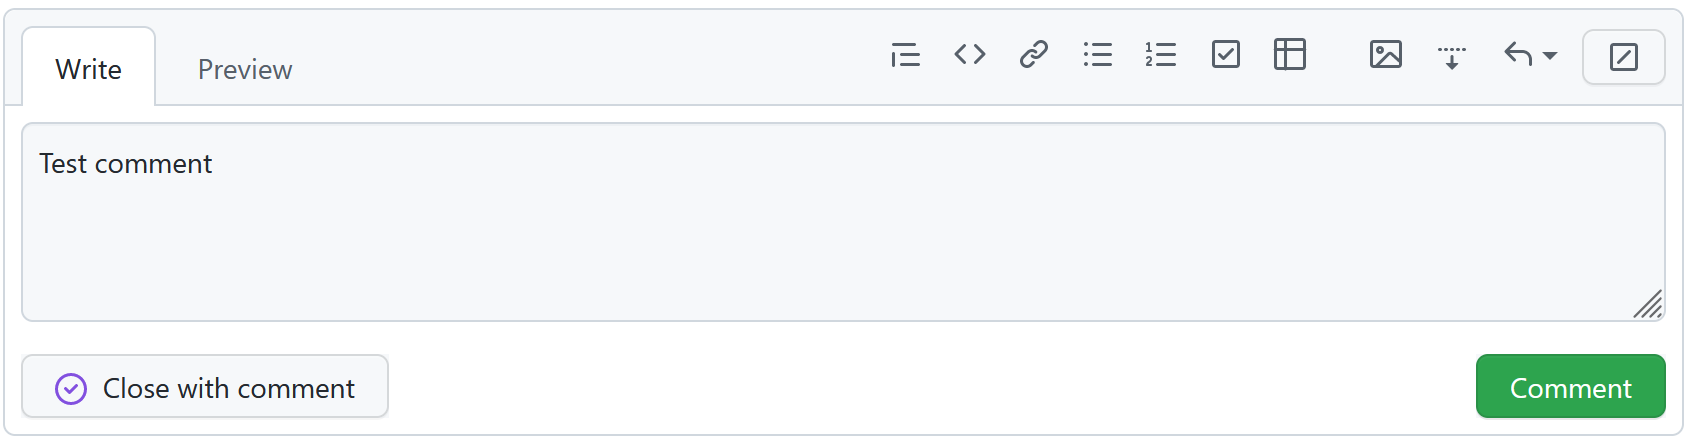
And it’ll get logged in my terminal!
1info: MyWebhookEventProcessor[0]
2      Test comment
Making it interactive
Logging things to the terminal is great and all, but to make it a bot it should really do something. For that I’ll need the Octokit package:
1dotnet add package Octokit
And I’ll use it in MyWebhookEventProcessor :
 1private readonly GitHubClient client;
 2
 3public MyWebhookEventProcessor(ILogger<MyWebhookEventProcessor> logger)
 4{
 5  this.logger = logger;
 6  this.client = new GitHubClient(new ProductHeaderValue("octokit-webhooks-sample"))
 7  {
 8    Credentials = new Credentials("...")
 9  };
10}
For this example I’m using a personal access token. You can create your own here. If I were deploying this as a production service, I would probably use something a bit more robust, like a GitHub App.
1protected override async Task ProcessIssueCommentWebhookAsync(WebhookHeaders headers, IssueCommentEvent issueCommentEvent, IssueCommentAction action)
2{
3  this.logger.LogInformation(issueCommentEvent.Comment.Body);
4  await this.client.Issue.Comment.Create(
5    repositoryId: issueCommentEvent.Repository.Id,
6    number: (int)issueCommentEvent.Issue.Number,
7    newComment: "Hello, world!"
8  );
9}
I need to do that cast from long to int because Octokit still has an open PR to convert all its IDs to long. I’ve also got to add the async modifier to my method, so I can await the issue comment creation method in Octokit.
Once I’ve done all that, I can create an issue comment on my repository on GitHub and my “bot” will reply!

What next?
If you find the library useful or interesting, give it a star on GitHub. And create an issue or pull request if you find find a bug or have a feature request.
If you want to create a fully-fledged bot, check out the GitHub documentation on creating a GitHub app. It’s the next progression from PATs, and allows you to more easily share your bot.
Apr 11, 2021 · 4 minute readAt its heart, Netlify is a platform for hosting static websites. I initially started using it as an alternative to GitHub Pages, and features like Netlify CMS and preview deploys really won me over. However, I recently got bit by preview deploys and the build minutes pricing.
I had a few GitHub repos set up to automatically deploy to Netlify previews from pull requests. I had also configured Renovate to automatically open pull requests for my dependencies. Javascript projects have a lot of dependencies, so there were more than a few pull requests!
Originally Netlify didn’t charge for build minutes, but in October 2019 they introduced a cap of 300 minutes per month on the start plan, with the option to buy packs of 500 build minutes for $7. I’m not criticising them for this change. I understand that they need to make money, and I think $7 for 500 minutes is a reasonable price. However, I don’t think Netlify has put the necessary protections in place for their customers.

SaaS cost attack
A quick Google search for “huge bill” for AWS, Azure, or GCP returns thousands of results. Stories of people who, at best, misconfigured their infrastructure or, at worst, were the target of a DDoS attack. Whatever the cause, the outcome is the same: a massive bill for thousands of dollars.
The big three cloud providers, and most other SaaS companies, offer some sort of protections or hard limits to prevent these sorts of surprises: Azure has Azure Cost Management + Billing, AWS has AWS Budget, and GCP has Cloud Billing budgets. Netlify has no such protections.

To me, this seems like a massive oversight and is a core feature that most users, and all business, would expect to have. Obviously the intention here is for Netlify to be able to charge customers when they exceed their build minutes. This also leaves open a massive opportunity for malicious actors to incur huge costs for Netlify customers with very little effort.
Proof-of-concept
Netlify allows you to configure your site’s build using a netlify.toml stored in the root of your repository. Here’s an excerpt taken from their documentation:
 1# Settings in the [build] context are global and are applied to all contexts
 2# unless otherwise overridden by more specific contexts.
 3[build]
 4  # Directory to change to before starting a build.
 5  # This is where we will look for package.json/.nvmrc/etc.
 6  base = "project/"
 7
 8  # Directory that contains the deploy-ready HTML files and assets generated by
 9  # the build. This is relative to the base directory if one has been set, or the
10  # root directory if a base has not been set. This sample publishes the
11  # directory located at the absolute path "root/project/build-output"
12  publish = "build-output/"
13
14  # Default build command.
15  command = "echo 'default context'"
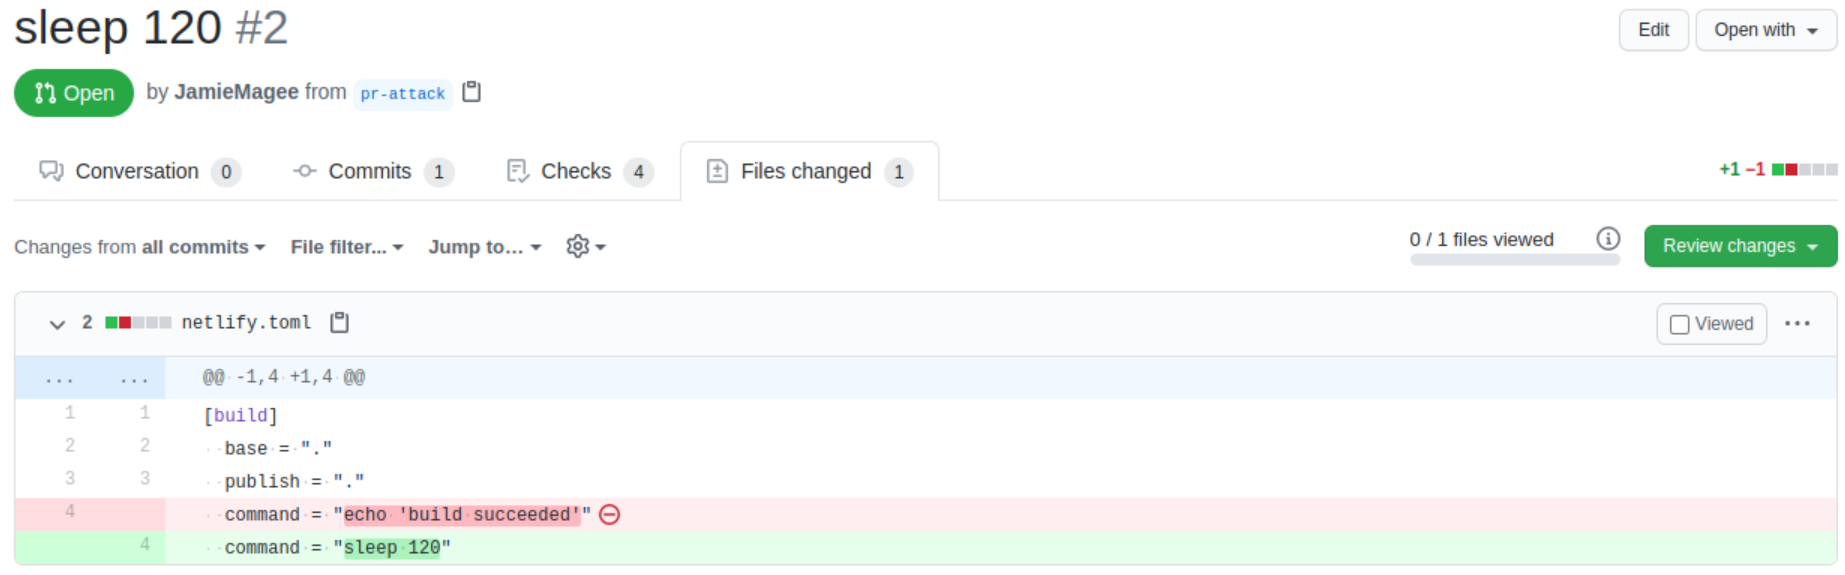
If I were to replace command with something like sleep 120 and open a pull request that uses Netlify and has not explicitly disabled deploy previews, the Netlify build will happily build my pull request and sleep for two minutes.
A quick search on GitHub for filename:netlify.toml shows there are approximately forty thousand repositories that are potentially vulnerable to this style of attack.
One small mercy is the fact that Netlify limits builds to 15 minutes by default. So, to cost anyone any money, someone would have to open 20 pull requests with command = "sleep 900". At that point, I hope either the repository owner would notice, GitHub would rate-limit you, or it would catch the attention of Netlify.
What next?
I was recently bitten by unexpected charges for build minutes. After contacting Netlify they, very kindly, forgave the charges. However, when I asked about billing protection for customers they replied:
Our policy is to keep your website and builds running as you expect, rather than leaving things in an inconsistent state. I understand it is not what you prefer, but it is what our business prioritizes - expected behavior and continuous uptime for your website and build processes. I have however recorded your feedback for our billing team.
Personally, I have disabled preview deploys on all my sites on Netlify and moved the builds to GitHub Actions. I still use Netlify for NetlifyCMS, but I might look into using NetlifyCMS with a custom OAuth provider in the future.
Dec 21, 2020 · 5 minute read#10YearChallenge has been trending for a while, so I thought it would be fun to do a 10 year challenge for programming and take a look at the technology I used back in 2010.
2010
10 years ago covers my final year in high school, and my first year in university. Both used completely different programming languages and tech stacks, so it’s an interesting place to look back at.
I was running Windows on my personal machine, but the computers in the engineering department at my university were running Linux (SUSE if I recall correctly). It wasn’t my first exposure to Linux, but I was still more comfortable using Windows at this point.
VB.NET
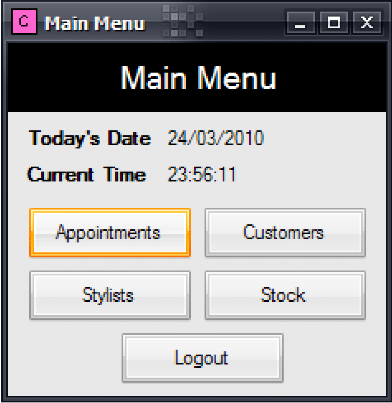
I started learning how to program in my final few years of high school. My computer science teacher started us off with Visual Basic .NET. We were actually the first year group to use this stack. Previously my school used Delpi and Pascal, so it was new to everyone.
For my final year project, I built a system for a hairdresser complete with appointment scheduling, customer database, and inventory management!
MATLAB
The first week of university we got thrown into the deep end with a week-long Lego Mindstorms coursework project. There were no real limitations except for your imagination… and your MATLAB skills. In the end, our team built a robot with an automatic gearbox.

Despite MATLAB’s reputation for not being a ‘real’ programming language, I used it a lot throughout all four years at university, including for my Master’s thesis! I’d really recommend MATLAB Cody if you’re looking to improve your MATLAB skills.
C++
Still one of the favourite languages for teaching undergraduates. C++ was used extensively, but one of my proudest pieces of work in C++ is still the logic simulator I wrote for a coursework project.
I really got to cut my teeth on C++ during my first ever internship, working on an H.265/HEVC video encoder at Cisco. To this day, it was some of the most challenging (in a good way) work I’ve done. Or to use someone else’s words “H.264 is Magic”.
2020
Flash forward to 2020 and I’ve been programming professionally for almost 6 years now. In that time, I’ve used a lot of different languages including Java, Python, and even a year working in X++ (despite my attempts to forget it!).
Even though I work at Microsoft, I’ve been running Arch Linux as my daily driver for over 3 years. Yes, I still need to use Windows in a VM from time to time, but the fact that I can achieve my developer workflow almost entirely from Linux just goes to show that Microsoft ♥ Linux isn’t just an empty platitude.
C#
It’s only in the last year or so that I’ve come back to working on a .NET stack, but already I’ve deployed applications on Azure Functions, ASP.NET Core running in Kubernetes, and most recently Service Fabric. C# is a real breath of fresh air coming from 4 years of Java, and I am really excited to see where the language goes after C# 8 and .NET 5.
TypeScript
If you’re doing front-end work nowadays, I think TypeScript is the best way to do it. It papers over the cracks of JavaScipt, and gives you much more confidence, especially when working in a large codebase. The most common stack I work in now is React + TypeScript, and it is a million times better than the jQuery days.
I’ve also used TypeScript for some back-end work too – most notably for Renovate. The type system really lends itself well to these sorts of back-end tasks, and I wouldn’t discount it over some of the more conventional stacks.
DevOps
Okay, so this one isn’t a programming language, but it’s definitely something that has changed the way I work. In this context, DevOps means a couple of things to me: testing, continuous integration/continuous delivery (CI/CD) and monitoring.
In 2010, testing meant manual testing. I remember for my hairdresser management system I had to document my manual test plan. It was a requirement of the marking scheme. Nowadays, it’s easier to think of testing as a pyramid with unit tests at the base, integration tests and E2E tests in the middle, and a small number of manual tests at the top. Ham Vocke’s The Practical Test Pyramid is the definitive guide for testing in 2020.
CI/CD has been one of my favourite topics lately. Even though the agile manifesto talked about it almost 20 years ago, only recently has the barrier to entry gotten so low. Between Github Actions, Gitlab CI, Travis CI and all the rest it’s a no-brainer. I use GitHub Actions in almost every side project I build.
Monitoring is such an important tool for running a successful service. You can use it to pre-emptively fix problems before they become problems or choose what areas to work on based on customer usage. Like CI/CD it’s become so easy now. For most platforms all you need to do is include an SDK!
2030?
Who knows what 2030 will bring? Maybe Rust will replace C++ everywhere? Maybe AI will have replaced programmers? Maybe Go will finally get generics?
Nov 28, 2020 · 7 minute readFollowing on from part one, here’s some more of the most common pitfalls I’ve come across—either myself, colleagues and friends, or examples in documentation—and how to avoid them.
‘Fake’-sync is not async
If the method you are calling is synchronous, even in an async method, then call it like any other synchronous method. If you want to yield the thread, then you should use Task.Yield in most cases. For UI programming, see this note about Task.Yield from the .NET API documentation.
 1public async Task DoStuffAsync(CancellationToken cancellationToken)
 2{
 3    await SomeAsyncMethod(cancellationToken);
 4
 5    // BAD: This provides no benefit and incurs the overhead of a thread hop
 6    await Task.Run(() =>
 7    {
 8        SomeSyncMethod();
 9        return Task.CompletedTask
10    });
11
12    // GOOD: Just keep the synchronous call on the current thread
13    SomeSyncMethod();
14
15    // GOOD: If you have a long-running loop, etc, then periodically yield for maximum thread sharing
16    for (int i = 0; i < 1000; i++)
17    {
18        if (i % 100 == 0)
19        {
20            await Task.Yield();
21        }
22
23        // In some cases you will need to do CPU intensive work. This is ok but
24        // care should be taken to yield at regular intervals
25        AnExpensiveMethod();
26    }
27}
Delegates
Here’s a common pitfall when passing actions as method parameters:
 1// A standard method which accepts a callback. The expectation is that
 2// all methods execute sequentially
 3public void DoSomething(Action callback)
 4{
 5    First();
 6
 7    try
 8    {
 9        callback();
10    }
11    catch (Exception ex)
12    {
13        Trace.WriteException(ex);
14    }
15    Second();
16}
17
18// GOOD: Invoked with an explicit action
19DoSomething(() => Console.WriteLine("Hello"));
20
21// BAD: This delegate is convertible to an async void method, which is allowed to be passed
22// to a method which accepts an Action.
23DoSomething(async () =>
24{
25    await Task.Delay(5000);
26    // UH-OH! This exception will not be observed by the catch handler in DoSomething above
27    // since the caller is not aware that this method is asynchronous
28    throw new Exception("This will not be observed");
29});
The implicit type conversion from the async function to Action is, surprisingly, not a compiler error! This happens because the function doesn’t have a return value, so it’s converted to a method with an async void signature. In this example the side effects aren’t bad, but in a real application this could be terrible as it violates the expected execution contract.
Synchronization
Synchronizing asynchronous code is slightly more complicated than synchronizing synchronous code. Mostly, this is because awaiting a task will result in switching to a different thread. This means that the standard synchronization primitives, which require the same thread to acquire and release a lock, won’t work when used in an async state machine.
Therefore, you must take care to use thread safe synchronization primitives in async methods. For example, using lock, will block the current thread while your code waits to gain exclusive access. In asynchronous code, threads should only block for a short amount of time.
In general, it’s not a good idea to perform any I/O under a lock. There’s usually a much better way to synchronize access in asynchronous programming.
 1private object _lock = new object();
 2
 3// GOOD: Don't do anything expensive inside a lock
 4lock (_lock)
 5{
 6    _cache = new Cache();
 7}
 8
 9// BAD: This is performing unnecessary I/O under a lock
10lock (_lock)
11{
12    _cache = Cache.LoadFromDatabase();
13}
Lazy Initialization
Imagine you need to lazy initialize some object under a lock.
 1private object _lock = new object();
 2private bool _initialized = false;
 3private int _value;
 4
 5// BAD: This method performs blocking I/O under a lock
 6public void Initialize()
 7{
 8    if (_initialized)
 9    {
10        return _value;
11    }
12
13    lock (_lock)
14    {
15        if (!_initialized)
16        {
17            _value = RetrieveData();
18            _initialized = true;
19        }
20    }
21
22    return _value;
23}
When converting RetrieveData to run asynchronously, you might try to rewrite Initialize a few different ways:
 1// BAD: Performs I/O and blocks under a lock
 2lock (_lock)
 3{
 4    if (!_initialized)
 5    {
 6        _value = RetrieveDataAsync().SyncResult();
 7        _initialized = true;
 8    }
 9}
10
11// BAD: Fails at runtime since you cannot change threads under a lock
12lock (_lock)
13{
14    if (!_initialized)
15    {
16        _value = await RetrieveDataAsync();
17        _initialized = true;
18    }
19}
But there are a few issues:
- You shouldn’t call external code under a lock. The caller has no idea what work the external code will do, or what assumptions it has made.
- You shouldn’t perform I/O under a lock. Code sections under a lock should execute as quickly as possible, to reduce contention with other threads. As soon as you perform I/O under a lock, avoiding contention isn’t possible.
SemaphoreSlim
If you absolutely must perform asynchronous work which limits the number of callers, .NET provides SemaphoreSlim which support asynchronous, non-blocking, waiting.
You still need to take care when converting from a synchronous locking construct. Semaphores, unlike monitor locks, aren’t re-entrant.
 1private readonly SemaphoreSlim m_gate = new SemaphoreSlim(1, 1);
 2
 3public async Task DoThingAsync(CancellationToken cancellationToken)
 4{
 5    // Be careful, semaphores aren't re-entrant!
 6    bool acquired = false;
 7    try
 8    {
 9        acquired = m_gate.WaitAsync(cancellationToken);
10        if (acquired)
11        {
12            // Now that we have entered our mutex it is safe to work on shared data structures
13            await DoMyCriticalWorkAsync(cancellationToken);
14        }
15    }
16    finally
17    {
18        if (acquired)
19        {
20            m_gate.Release();
21        }
22    }
23}
IDisposable
IDisposible is used to finalize acquired resources. In some cases, you need to dispose of these resources asynchronously, to avoid blocking. Unfortunately, you can’t do this inside Dispose().
Thankfully, .NET Core 3.0 provides the new IAsyncDisposible interface, which allows you to handle asynchronous finalization like so:
 1class Foo : IAsyncDisposable
 2{
 3    public async Task DisposeAsync()
 4    {
 5        await SomethingAsync();
 6    }
 7}
 8
 9await using (var foo = new Foo())
10{
11    return await foo.DoSomethingAsync();
12}
IEnumerable and IEnumerator
Usually you would implement IEnumerable or IEnumerator so you can use syntactic sugar, like foreach and LINQ-to-Objects. Unfortunately, these are synchronous interfaces that can only be used on synchronous data sources. If your underlying data source is actually asynchronous, you shouldn’t expose it using these interfaces, as it will lead to blocking.
With the release of .NET Core 3.0 we got the IAsyncEnumerable and IAsyncEnumerator interfaces, which allow you to enumerate asynchronous data sources:
1await foreach (var foo in fooCollection)
2{
3    await foo.DoSomethingAsync();
4}
Prefer the compiler-generated state machine
There are some valid cases for using Task.ContinueWith, but it can introduce some subtle bugs if not used carefully. It’s much easier to avoid it, and just use async and await instead.
 1// BAD: This is using promise-based constructs
 2public Task DoThingAsync()
 3{
 4    return DoMoreThingsAsync().ContinueWith((t) => DoSomethingElse());
 5}
 6
 7// BAD: A much worse version of the above
 8public Task<int> DoThingAsync()
 9{
10    var tcs = new TaskCompletionSource<int>();
11    DoMoreThingsAsync().ContinueWith(t =>
12    {
13        var result = t.Result;
14
15        // UH-OH! The call to .Result is valid, however, it doesn't properly handle exceptions
16        // which can lead to an async call chain which never completes. This is an very difficult
17        // issue to debug as all evidence is garbage collected.
18        tcs.SetResult(result);
19    }
20
21    return tcs.Task;
22}
23
24// GOOD: This is using await
25public async Task DoThingAsync()
26{
27     await DoMoreThingsAsync();
28     DoAnotherThing();
29}
TaskCompletionSource
TaskCompletionSourc<T> allows you to support manual completion in asynchronous code. In general, this class should not be used… but when you have to use it you should be aware of the following behaviour:
 1var waiters = new List<TaskCompletionSource<int>>();
 2
 3// BAD: This uses default continuation options which result in synchronous callbacks
 4Task SomeMethod(CancellationToken cancellationToken)
 5{
 6    var tcs1 = new TaskCompletionSource<int>();
 7    waiters.Add(tcs1);
 8    return tcs1.Task;
 9}
10
11// GOOD: This uses explicit asynchronous continuations
12Task SomeMethod(CancellationToken cancellationToken)
13{
14    var tcs2 = new TaskCompletionSource<int>(TaskCreationOptions.RunContinuationsAsynchronously);
15    waiters.Add(tcs2);
16    return tcs2.Task;
17}
18
19// The problem comes in when a caller awaits your task. The callee may have an expectation that the callbacks execute
20// quickly, but in the example below this is only true for the implementation which specifies asynchronous continuation.
21// The reason is the caller of TaskCompletionSource<T>.SetResult will be blocked for the entire duration of the loop
22// below when using the first implementation, while in the second implementation the loop will run on a different thread
23// and the caller may continue execution quickly as expected.
24async Task SomeCaller(CancellationToken cancellationToken)
25{
26    var foo = await SomeMethod();
27    for (int i = 0; i < 10000; i++)
28    {
29        // Do something synchronous and expensive
30    }
31}