Nov 17, 2020 · 8 minute readThe .NET Framework provides a great programming model that enables high performance code using an easy to understand syntax. However, this can often give developers a false sense of security, and the language and runtime aren’t without pitfalls. Ideally static analysers, like the Microsoft.VisualStudio.Threading.Analyzers Roslyn analysers, would catch all these issues at build time. While they do help catch a lot of mistakes, they can’t catch everything, so it’s important to understand the problems and how to avoid them.
Here’s a collection of some of the most common pitfalls I’ve come across—either myself, colleagues and friends, or examples in documentation—and how to avoid them.
Blocking calls
The main benefit of asynchronous programming is that the thread pool can be smaller than a synchronous application while performing the same amount of work. However, once a piece of code begins to block threads, the resulting thread pool starvation can be ugly.
 1public async Task DoStuffAsync(CancellationToken cancellationToken)
 2{
 3    Task<bool> resultTask = StuffAsync(cancellationToken);
 4
 5    // BAD: These may deadlock depending on thread pool capacity or the presence of a sync context
 6    resultTask.Wait();
 7    resultTask.Result;
 8    resultTask.GetAwaiter().GetResult();
 9
10    // BAD: This blocks the thread
11    Thread.Sleep(5000);
12
13    // GOOD: Always await
14    await resultTask;
15
16    // GOOD: This does not block and allows for maximum throughput
17    await Task.Delay(5000, cancellationToken);
18}
If I run a small test, which makes 5000 concurrent HTTP requests to a local server, there are dramatically different results depending on how many blocking calls are used.
% blocking shows the number of calls that use Task.Result, which blocks the thread. All other requests use await.
| % Blocking | Threads | Total Duration | Avg. Duration |
|---|
| 0 | 24 | 00:00:11.961 | 0.0023923 |
| 5 | 268 | 00:02:16.574 | 0.0273148 |
The increased total duration when using blocking calls is due to the thread pool growth, which happens slowly. You can always tune the thread pool settings to achieve better performance, but it will never match the performance you can achieve with non-blocking calls.
Streams
Like all other blocking calls, any methods from System.IO.Stream should use their async equivalents: Read to ReadAsync, Write to WriteAsync, Flush to FlushAsync, etc. Also, after writing to a stream, you should call the FlushAsync method before disposing the stream. If not, the Dispose method may perform some blocking calls.
CancellationToken
You should always propagate cancellation tokens to the next caller in the chain. This is called a cooperative cancellation model. If not, you can end up with methods that run longer than expected, or even worse, never complete.
To indicate to the caller that cancellation is supported, the final parameter in the method signature should be a CancellationToken object.
 1public async Task DoStuffAsync()
 2{
 3    // BAD: This method does not accept a cancellation token. Cooperative cancellation is extremely important.
 4    await StuffAsync();
 5}
 6
 7public async Task DoStuffAsync(CancellationToken cancellationToken)
 8{
 9    var httpClient = new HttpClient();
10
11    // BAD: The caller has provided a cancellation token for cooperative cancellation but it was not provided
12    // downstream. Regardless of the token being signaled the http client will not return until the
13    // operation completes.
14    await httpClient.GetAsync("http://example.com");
15
16    // GOOD: Always propagate the token to the next caller in the chain
17    await httpClient.GetAsync("http://example.com", cancellationToken);
18}
Linked tokens
If you need to put a timeout on an inner method call, you can link one cancellation token to another. For example, you want to make a service-to-service call, and you want to enforce a timeout, while still respecting the external cancellation.
 1public async Task<int> DoThingAsync(CancellationToken cancellationToken)
 2{
 3    using (var cancelTokenSource = CancellationTokenSource.CreateLinkedTokenSource(cancellationToken))
 4    {
 5        // The cancellation token source will now manage a timer which automatically notifies the parent
 6        // token.
 7        cancelTokenSource.CancelAfter(TimeSpan.FromSeconds(10));
 8
 9        // By linking the token source we will now cooperatively cancel. We have also
10		// provided a time based auto-cancellation signal which only applies to the
11		// the single method. This is how nested cancellation scopes may be used in circuit breakers.
12        await GetAsync(cancelTokenSource.Token);
13    }
14
15    // Other calls within the method may not need this restricted timeout so the original
16    // cancellation token is used instead.
17    await DoOtherThingAsync(cancellationToken);
18}
Cancelling uncancellable operations
Sometimes you may find the need to call an API which does not accept a cancellation token, but your API receives a token and is expected to respect cancellation. In this case the typical pattern involves managing two tasks and effectively abandoning the un-cancellable operation after the token signals.
 1public async Task<int> DoThingAsync(CancellationToken cancellationToken)
 2{
 3    var tcs = new TaskCompetionSource<int>();
 4    using (var registration = cancellationToken.Register(() => tcs.SetResult(0)))
 5    {
 6         var completedTask = await Task.WhenAny(tcs.Task, DoNonCancellableCallAsync());
 7         if (completedTask == tcs.Task)
 8         {
 9             // We have been cancelled, so take appropriate action here. At this point in time the non-cancellable call is
10             // still running. Once it completes everything will be properly garbage collected
11             throw new OperationCanceledException(cancellationToken);
12         }
13
14        return await completedTask;
15    }
16}
Constructors
Occasionally, you may find yourself wanting to perform asynchronous work during initialization of a class instance. Unfortunately, there is no way to make constructors async.
 1public class Foo
 2{
 3    public Foo(int a, int c)
 4    {
 5        _a = a;
 6        // DON'T DO THIS!
 7        _b = CallSomethingAsync().SyncResult();
 8        _c = c;
 9    }
10
11    private readonly int _a;
12    private readonly string _b;
13    private readonly int _c;
14}
There are a couple of different ways to solve this. Here’s a pattern I like:
- A public static creator method, which publicly replaces the constructor
- A private async member method, which does the work the constructor used to do
- A private constructor, so callers can’t directly instantiate the class by mistake
So, if I apply the same pattern to the class above the class becomes:
 1public class Foo
 2{
 3    public static async Task<Foo> CreateAsync(int a, int c)
 4    {
 5        Foo instance = new Foo(a, c);
 6        await instance.InitializeAsync();
 7        return instance;
 8    }
 9
10    private Foo(int a, int c)
11    {
12        // GOOD: readonly keyword is retained
13        _a = a;
14        _c = c;
15    }
16
17    private async Task InitializeAsync()
18    {
19        // GOOD: all async work is performed here
20        // NOTE: make sure initialization order is correct when porting existing code
21        _b = await CallSomethingAsync();
22    }
23
24    private readonly int _a;
25    private readonly int _c;
26
27    string _b;
28}
And we can instantiate the class by calling var foo = await Foo.CreateAsync(1, 2);.
In cases where the class is part of an inheritance hierarchy, the constructor can be made protected and InitializeAsync can be made protected virtual, so it can be overridden and called from derived classes. Each derived class will need to have its own CreateAsync method.
Parallelism
Avoid premature optimization
It might be very tempting to try to perform parallel work by not immediately awaiting tasks. In some cases, you can make significant performance improvements. However, if not used with care you can end up in debugging hell involving socket or port exhaustion, or database connection pool saturation.
 1public async Task DoTwoThingsAsync(CancellationToken cancellationToken)
 2{
 3    // Depending on what you are doing under the covers, this may cause unintended
 4    // consequences such as exhaustion of outgoing sockets or database connections.
 5    var thing1Task = FirstAsync(cancellationToken);
 6    var thing2Task = SecondAsync(cancellationToken);
 7    await Task.WhenAll(thing1Task, thing2Task);
 8
 9    // Prefer sequential execution of asynchronous calls
10    await FirstAsync(cancellationToken);
11    await SecondAsync(cancellationToken);
12}
Using async everywhere generally pays off without having to make any individual piece of code faster via parallelization. When threads aren’t blocking you can achieve higher performance with the same amount of CPU.
Avoid Task.Factory.StartNew, and use Task.Run only when needed
Even in the cases where not immediately awaiting is safe, you should avoid Task.Factory.StartNew, and only use Task.Run when you need to run some CPU-bound code asynchronously.
The main way Task.Factory.StartNew is dangerous is that it can look like tasks are awaited when they aren’t. For example, if you async-ify the following code:
1Task.WhenAll(Task.Factory.StartNew(Foo), Task.Factory.StartNew(Foo2)).Wait();
be careful because changing the delegate to one that returns Task, Task.Factory.StartNew will now return Task<Task>. Awaiting only the outer task will only wait until the actual task starts, not finishes.
1// BAD: Only waits until all tasks have been scheduled, not until the actual work has completed
2await Task.WhenAll(Task.Factory.StartNew(FooAsync), Task.Factory.StartNew(Foo2Async));
Normally what you want to do, when you know delegates are not CPU-bound, is to just use the delegates themselves. This is almost always the right thing to do.
1// GOOD: Will wait until the tasks have all completed
2await Task.WhenAll(FooAsync(), Foo2Async());
However, if you are certain the delegates are CPU-bound, and you want to offload this to the thread pool, you can use Task.Run. It’s designed to support async delegates. I’d still recommend reading Task.Run Etiquette and Proper Usage for a more thorough explanation.
1
2// Ok if FooAsync is known to be primarily CPU-bound (especially before going async).
3// Will schedule the CPU-bound work like Task.Factory.StartNew does,
4// and automatically convert Task<Task> into a 'proxy' Task that represents the actual work
5await Task.WhenAll(Task.Run(FooAsync), Task.Run(Foo2Async))
If, for some extremely unlikely reason, you really do need to use Task.Factory.StartNew you can use Unwrap() or await await to convert a Task<Task> into a Task that represents the actual work. I’d recommend reading Task.Run vs Task.Factory.StartNew for a deeper dive into the topic.
Null conditionals
Using the null conditional operator with awaitables can be dangerous. Awaiting null throws a NullReferenceException.
1// BAD: Will throw NullReferenceException if foo is null
2await foo?.DoStuffAsync()
Instead, you must do a manual check first.
1// GOOD
2if (foo != null)
3{
4    await foo.DoStuffAsync();
5}
A Null-conditional await is currently under consideration for future versions of C#, but until then you’re stuck with manually checking.
Apr 7, 2020 · 2 minute readGetting Zwift to run on Linux was a journey I started just over a year ago. I didn’t get very far with my effort, but since then a lot of progress has been made by the Wine developers and others in the community, and Zwift is now (mostly) playable on Linux. I’ll admit there are some workarounds required. Like having to use the Zwift companion app to connect sensors. But on the whole, it works well. So I wanted to summarise the process for anyone who wants to try it for themselves.
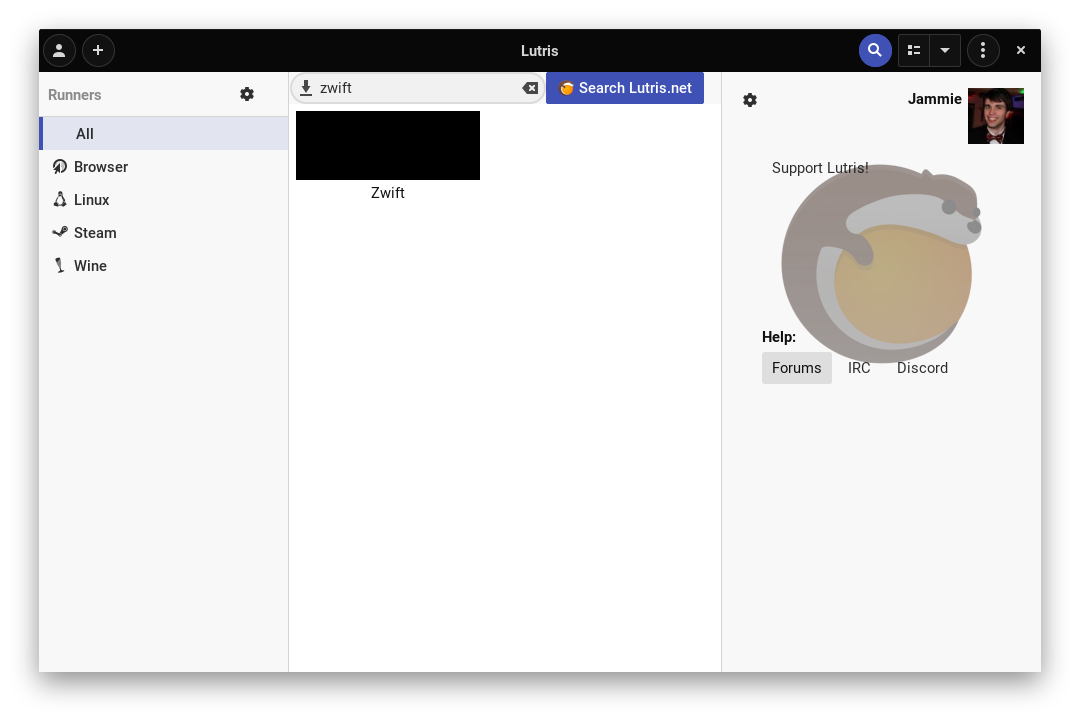
I’m using Lutris, a gaming client for Linux, to script out all the steps needed to make games playable on Linux. If you’ve never used it before, I’d really recommend it for gaming on Linux in general. First things first, you’re going to have to download and install Lutris for your Linux distribution. Thankfully Lutris has a great help page explaining how to do this for most distributions.
Installation
Once you’ve got Lutris installed, installing Zwift is pretty easy. In Lutris search for Zwift, select the only result, and click the “Install” button to start the installation process. You can also start the installer from the command line by running lutris install/zwift-windows.
This might take a while, and depending on your internet speed could be anywhere from 10 minutes to around an hour.
Once the Zwift launcher has finished downloading and updating, we’ve hit the first hurdle that can’t be scripted with Lutris.
Watch on YouTube: "Zwift on Linux - Part Two"The launcher will appear as a blank white window. Actually, the launcher is displaying a web page, but Wine can’t render properly. Thankfully all the files are already downloaded, so all you need to do is quit the launcher window, and exit Zwift from the Wine system menu. After that, the Lutris installer should complete.
Running Zwift
Zwift requires the Launcher to be running all the time while in-game. However, Lutris only allows 1 application to launch from the “Play” button. So before you hit the play button, first you need to click “Run EXE inside wine prefix” and browse to drive_c\Program Files (x86)\Zwift\ZwiftLauncher. You should see that familiar blank white screen.
Finally, you can hit the “Play” button and Ride On 👍
Watch on YouTube: "Zwift on Linux - Part Three" Apr 2, 2020 · 8 minute readSince the release of Helm 3, the official helm/charts repository has been deprecated in favour of Helm Hub. While it’s great for decentralization and the long term sustainability of the project, I think there’s a lot more that is lost. Where is the best place to go for of the expert advice now? Installing Helm now requires you to manually add each repository you use. And there’s now some added friction to hosting your Helm charts.
Thankfully GitHub has all the tools required, in the form of GitHub Pages and GitHub Actions, to host a fully automated build pipeline and to host a repository for your Helm charts. Also, we can use some of the tools from the community to ensure our charts are high quality.
GitHub Pages
First you need to go ahead and create a gh-pages branch in your repository. As I’m writing this there’s an issue open to do this automatically, but to do it manually you can run the following:
1git checkout --orphan gh-pages
2git rm -rf .
3git commit -m "Initial commit" --allow-empty
4git push
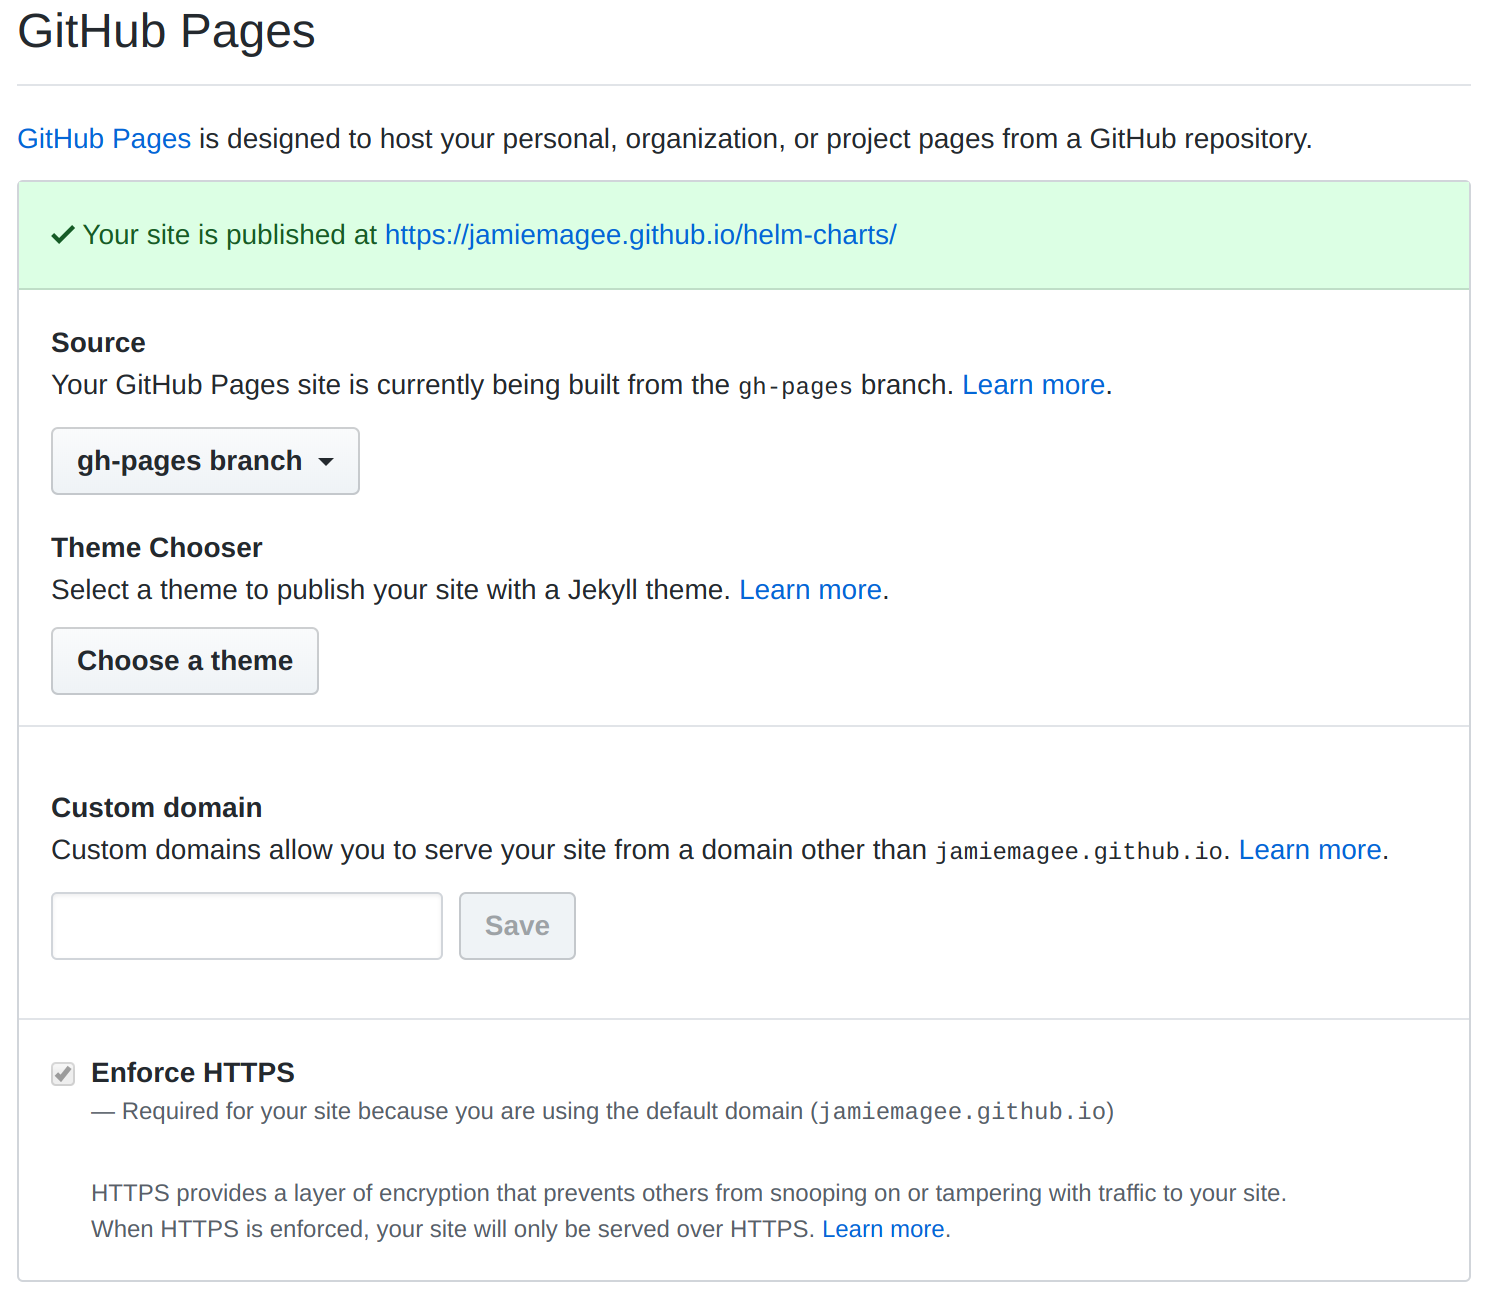
Once you’ve done that, you need to enable GitHub Pages in your repository. Go to the settings page on your repository and set the source branch to the gh-pages branch you just created.
Now you’ve configured GitHub Pages, it will act as your Helm repository. Next, you need to configure GitHub Actions to publish to there.
GitHub Actions
You’re going to use GitHub Actions to create two workflows: one for pull requests, and one for commits to master. Your pull request workflow will deal with linting and testing your chart using a collection of automated tooling. While this isn’t a direct replacement for the expert advice offered by the Helm community, it’s better than nothing. Your master branch workflow will deal with releasing your charts using GitHub pages, meaning you never have to do it manually.
First up let’s look at the pull request workflow.
Pull requests
For each pull request in your chart repository, you want to run a series of different validation and linting tools to catch any avoidable mistakes in your Helm charts. To do that, go ahead and create a workflow in your repository by creating a file at .github/workflows/ci.yaml and add the following YAML to it:
1name: Lint and Test Charts
2
3on:
4  pull_request:
5    paths:
6      - 'charts/**'
7
8jobs:
This will run the workflow on any pull request that changes files under the charts directory.
That’s the skeleton of the workflow sorted, next onto the tools that you’re going to use.
Chart Testing
The Helm project created Chart Testing, AKA ct, as a comprehensive linting tool for Helm charts. To use it in your pull request build, you’ll go ahead and add the following job:
 1lint-chart:
 2  runs-on: ubuntu-latest
 3  steps:
 4    - name: Checkout
 5      uses: actions/checkout@v1
 6    - name: Run chart-testing (lint)
 7      uses: helm/chart-testing-action@master
 8      with:
 9        command: lint
10        config: .github/ct.yaml
Where ct.yaml is:
1helm-extra-args: --timeout 600
2check-version-increment: true
3debug: true
For a full list of configuration options check out this sample file.
The lint action for Chart Testing is a bit of a catch-all that helps you prevent a lot of potential bugs or mistakes in your charts. That includes:
- Version checking
- YAML schema validation on
Chart.yaml - YAML linting on
Chart.yaml and values.yaml - Maintainer validation on changed charts
Helm-docs
Helm-docs isn’t strictly a linting tool, but it makes sure that your documentation stays up-to-date with the current state of your chart. It requires that you create a README.md.gotmpl in each chart repository using the available templates, otherwise it will create a README.md for you using a default template.
To use it as part of your pull request build, you need to add the following job:
1lint-docs:
2  runs-on: ubuntu-latest
3  needs: lint-chart
4  steps:
5    - name: Checkout
6      uses: actions/checkout@v1
7    - name: Run helm-docs
8      run: .github/helm-docs.sh
Where helm-docs.sh is:
 1#!/bin/bash
 2set -euo pipefail
 3
 4HELM_DOCS_VERSION="0.11.0"
 5
 6# install helm-docs
 7curl --silent --show-error --fail --location --output /tmp/helm-docs.tar.gz https://github.com/norwoodj/helm-docs/releases/download/v"${HELM_DOCS_VERSION}"/helm-docs_"${HELM_DOCS_VERSION}"_Linux_x86_64.tar.gz
 8tar -xf /tmp/helm-docs.tar.gz helm-docs
 9
10# validate docs
11./helm-docs
12git diff --exit-code
This runs Helm-docs against each chart in your repository and generates the README.md for each one. Then, using git, you’ll fail the build if there are any differences. This ensures that you can’t check in any changes to your charts without also updating the documentation.
Kubeval
Next up is Kubeval. It validates the output from Helm against schemas generated from the Kubernetes OpenAPI specification. You’re going to add it to your pull request, and use it to validate across multiple different versions of Kubernetes. Add the following job:
 1kubeval-chart:
 2  runs-on: ubuntu-latest
 3  needs:
 4    - lint-chart
 5    - lint-docs
 6  strategy:
 7    matrix:
 8      k8s:
 9        - v1.12.10
10        - v1.13.12
11        - v1.14.10
12        - v1.15.11
13        - v1.16.8
14        - v1.17.4
15  steps:
16    - name: Checkout
17      uses: actions/checkout@v1
18    - name: Run kubeval
19      env:
20        KUBERNETES_VERSION: ${{ matrix.k8s }}
21      run: .github/kubeval.sh
Where kubeval.sh is:
 1#!/bin/bash
 2set -euo pipefail
 3
 4CHART_DIRS="$(git diff --find-renames --name-only "$(git rev-parse --abbrev-ref HEAD)" remotes/origin/master -- charts | grep '[cC]hart.yaml' | sed -e 's#/[Cc]hart.yaml##g')"
 5KUBEVAL_VERSION="0.14.0"
 6SCHEMA_LOCATION="https://raw.githubusercontent.com/instrumenta/kubernetes-json-schema/master/"
 7
 8# install kubeval
 9curl --silent --show-error --fail --location --output /tmp/kubeval.tar.gz https://github.com/instrumenta/kubeval/releases/download/"${KUBEVAL_VERSION}"/kubeval-linux-amd64.tar.gz
10tar -xf /tmp/kubeval.tar.gz kubeval
11
12# validate charts
13for CHART_DIR in ${CHART_DIRS}; do
14  helm template "${CHART_DIR}" | ./kubeval --strict --ignore-missing-schemas --kubernetes-version "${KUBERNETES_VERSION#v}" --schema-location "${SCHEMA_LOCATION}"
15done
This script is a bit longer, but if you break it down step-by-step it’s essentially:
- Get a list of charts that have been changed between this PR and master branch
- Install Kubeval
- For each chart:
- Generate the Kubernetes configuration using Helm
- Validatate the configuration using Kubeval
You’re doing this for each version of Kubernetes you’ve defined in the job, so if you’re using an API that isn’t available in all versions, Kubeval will fail the build. This help keep backwards compatibility for all of your charts, and makes sure you’re not releasing breaking changes accidentally.
This doesn’t guarantee that the chart will actually install successfully on Kubernetes—but that’s where Kubernetes in Docker comes in.
Kubernetes in Docker (KIND)
Finally you’re going to use Chart Testing again to install your Helm charts on a Kubernetes cluster running in the GitHub Actions runner using Kubernetes in Docker (KIND). Like Kubeval, you can create clusters for different versions of Kubernetes.
KIND doesn’t publish Docker images for each version of Kubernetes, so you need to look at the Docker image tags. That’s why the Kubernetes versions in this job won’t necessarily match the versions used for the Kubeval job.
 1install-chart:
 2  name: install-chart
 3  runs-on: ubuntu-latest
 4  needs:
 5    - lint-chart
 6    - lint-docs
 7    - kubeval-chart
 8  strategy:
 9    matrix:
10      k8s:
11        - v1.12.10
12        - v1.13.12
13        - v1.14.10
14        - v1.15.7
15        - v1.16.4
16        - v1.17.2
17  steps:
18    - name: Checkout
19      uses: actions/checkout@v1
20    - name: Create kind ${{ matrix.k8s }} cluster
21      uses: helm/kind-action@master
22      with:
23        node_image: kindest/node:${{ matrix.k8s }}
24    - name: Run chart-testing (install)
25      uses: helm/chart-testing-action@master
26      with:
27        command: install
28        config: .github/ct.yaml
So you got a temporary Kubernetes cluster, installed your charts on it, and ran any helm tests (that you definitely wrote 🙄). This is the ultimate test of your Helm chart—installing and running it. If this passes, and you merge your pull request, you’re ready to release!
Releasing
Remember that gh-pages branch you created earlier? Now you can use it to publish your fully tested Helm chart to.
You’re going to create another GitHub workflow, this time at .github/workflows/release.yaml. This one is going to be significantly simpler:
 1name: Release Charts
 2
 3on:
 4  push:
 5    branches:
 6      - master
 7    paths:
 8      - 'charts/**'
 9
10jobs:
11  release:
12    runs-on: ubuntu-latest
13    steps:
14      - name: Checkout
15        uses: actions/checkout@v1
16      - name: Configure Git
17        run: |
18          git config user.name "$GITHUB_ACTOR"
19          git config user.email "$GITHUB_ACTOR@users.noreply.github.com"
20      - name: Run chart-releaser
21        uses: helm/chart-releaser-action@master
22        env:
23          CR_TOKEN: '${{ secrets.CR_TOKEN }}'
It will check out the repository, set the configuration of Git to the user that kicked-off the workflow, and run the chart releaser action. The chart releaser action will package the chart, create a release from it, and update the index.yaml file in the gh-pages branch. Simple!
But one thing you still need to do is create a secret in your repository, CR_TOKEN, which contains a GitHub personal access token with repo scope. This is due to a GitHub Actions bug, where GitHub Pages is not deployed when pushing from GitHub Actions.

Once that’s all configured, any time a change under the charts directory is checked in, like from a pull request, your Github workflow will run and your charts will be available almost instantly!
Next steps
From here you’ll want to add your repository to Helm so you can use it, and share it on Helm Hub so others can too. For the former, you’ll need to run:
1helm repo add renovate https://<username>.github.io/<repository>/
2helm repo update
And for the latter, the Helm project have written a comprehensive guide that I couldn’t possibly top.
If you want to see all these pieces working together checkout the renovatebot/helm-charts repository, or our page on Helm Hub. And if you would like some help please reach out to me on Bluesky at @jamiemagee.bsky.social.
Mar 16, 2020 · 5 minute readOver the past year I’ve moved from working mainly in Java, to working mainly in C#. To be honest, Java and C# have more in common than not, but one of the major differences is async/await. It’s a really powerful tool if used correctly, but also a very quick way to shoot yourself in the foot.
Asynchronous programming looks very similar to synchronous programming. However, there are some core concepts which need to be understood in order to form a proper mental model when converting between synchronous and asynchronous programming patterns.
Here are some of the most common ones I’ve come across.
Naming
Method names must use the suffix Async when returning a Task or Task<T>. Consistency is key as the Async suffix provides not only a mental signal to the caller that the await keyword should be used, but also provides a consistent naming convention.
1// Synchronous method
2public void DoSomething() { … }
3
4// Asynchronous method
5public async Task DoSomethingAsync() { … }
Return types
Every async method returns a Task. Use Task when there is no specific result for the method, which is synonymous with void. Use Task<T> when a return value is required.
 1// Original method
 2public void DoSomething()
 3{
 4    using (var client = new HttpClient())
 5    {
 6        client.GetAsync().Result;
 7    }
 8}
 9
10// BAD: This utilizes an anti-pattern. async void provides no mechanism
11// for the caller to observe the result, including exceptions.
12public async void DoSomethingAsync()
13{
14    using (var client = new HttpClient())
15    {
16        await client.GetAsync();
17    }
18}
19
20// GOOD: This provides proper access to the completion task. The caller may now
21// await the method call and observe/handle results and exceptions correctly.
22public async Task DoSomethingAsync()
23{
24    using (var client = new HttpClient())
25    {
26        await client.GetAsync();
27    }
28}
Parameters
There is not a way for the compiler to manage ref and out parameters. (That’s a topic for another time.) When multiple values need to be returned you should either use custom objects or a Tuple.
 1// Original method
 2public bool TryGet(string key, out string value)
 3{
 4    value = null;
 5    if (!m_cache.TryGetValue(key, out value))
 6    {
 7        value = GetValueFromSource(key);
 8    }
 9
10    return value != null;
11}
12
13// New method
14public async Task<(bool exists, string value)> TryGetAsync(string key)
15{
16    string value = null;
17    if (!m_cache.TryGetValue(key, out value))
18    {
19        value = await GetValueFromSourceAsync(key);
20    }
21
22    return (value != null, value);
23}
Delegates
Following up on the lack of the void return type, no async method should be defined as an Action variant. When accepting a delegate to an asynchronous method, the asynchronous pattern should be propagated by accepting Func<Task> or Func<Task<T>>.
 1public void TraceHelper(Action action)
 2{
 3    Trace.WriteLine("calling action");
 4    action();
 5    Trace.WriteLine("called action");
 6}
 7
 8// Action => Func<Task>
 9// Action<T> maps to Func<T, Task>
10// etc.
11public async Task TraceHelperAsync(Func<Task> action)
12{
13    Trace.WriteLine("calling action");
14    await action();
15    Trace.WriteLine("called action");
16}
17
18// Example call to the method with a synchronous callback implementation
19await TraceHelperAsync(() => { Console.WriteLine("Called me"); return Task.CompletedTask; });
Virtual methods
In asynchronous programming there is no concept of a void return type, as the basis of the model is that each method returns a mechanism for signalling completion of the asynchronous work. When converting base classes which have empty implementations or return constant values, the framework provides methods and helpers to facilitate the pattern.
 1// The original synchronous version of the class
 2public class MyClass
 3{
 4    protected virtual void DoStuff()
 5    {
 6        // Do nothing
 7    }
 8
 9    protected virtual int GetValue()
10    {
11        return 0;
12    }
13}
14
15// The converted asynchronous version of the class
16public class MyClass
17{
18    protected virtual Task DoStuffAsync(CancellationToken cancellationToken)
19    {
20        // This static accessor avoids new allocations for synchronous 'no-op' methods such as this
21        return Task.CompletedTask;
22    }
23
24    protected virtual Task<int> GetValueAsync(CancellationToken cancellationToken)
25    {
26        // This factory method returns a completed task with the specified result
27        return Task.FromResult(0);
28    }
29}
Interfaces
Like delegates, interfaces should always be declared async which ensures an async-aware model throughout the stack.
 1public interface IMyPlugin
 2{
 3    Task DoStuffAsync(CancellationToken cancellationToken);
 4    Task<int> DoMoreAsync(CancellationToken cancellationToken);
 5}
 6
 7public class MyPluginImpl : IMyPlugin
 8{
 9    // When the method does not have a result, use the static accessor
10    public Task DoStuffAsync(CancellationToken cancellationToken)
11    {
12        DoSomething();
13        return Task.CompletedTask;
14    }
15
16    // When the method has a result, use the static factory function
17    public Task<int> DoMoreAsync(CancellationToken cancellationToken)
18    {
19        DoSomething();
20        return Task.FromResult(0);
21    }
22}
Mocks
In certain cases, mostly unit test mocks, you may find the need to implement interfaces without having any reason to actually perform any asynchronous calls. In these specific cases it is OK to feign asynchronous execution using Task.CompletedTask or Task.FromResult<T>(T result).
 1// Example mock implementation for testing. Moq is not smart enough to generate a non-null completed
 2// task by default, so you will need to explicitly mock out all methods
 3Mock<IMyPlugin> mockPlugin = new Mock<IMyPlugin>();
 4
 5// When a constant value is returned
 6mockPlugin.Setup(x => x.DoStuffAsync(It.IsAny<CancellationToken>()).Returns(Task.CompletedTask);
 7mockPlugin.Setup(x => x.DoMoreAsync(It.IsAny<CancellationToken>()).ReturnsAsync(1);
 8
 9// When a dynamic value is returned
10mockPlugin.Setup(x => x.DoStuffAsync(It.IsAny<CancellationToken>()).Returns(() =>
11{
12     DoStuffImpl();
13     return Task.CompletedTask;
14});
15mockPlugin.Setup(x => x.DoMoreAsync(It.IsAny<CancellationToken>()).Returns(() =>
16{
17     DoMoreImpl();
18     return Task.FromResult(1);
19});
Summary
Overall asynchronous programming is much better for performance, but requires a slightly different mental model. I hope these tips help!
Oct 23, 2019 · 1 minute readAt CopenhagenJS in August I was able to share my work on Renovate—a universal dependency update tool—and how you can use it to save time and improve security in software projects.
If you want to find out more about Renovate you can find us on GitHub.
Watch on YouTube: "Automated Dependency Updates with Renovate"